Thursday, April 24, 2014

Spring Giving

Hello everyone! I hope you all had a wonderful Easter to share and enjoy with your loved ones. Hasn't the weather been wonderful? I've been cooped up most of this week, except yesterday when I got to shop with my best friend and her mom in a quaint little town in my state. It was a nice break for my hands, which have been busy knitting and crocheting gifts for my therapist, who is expecting. It is no secret that for almost two years now I have battled my fair share of depression, as well as OCD since I was 8. My therapist was one of the people who promoted me to keep working at my knitting and crocheting as a tool to treat my depression. It has helped me wonders, and it is now my passion. When she told me she is expecting, I knew I had to make her some cute baby stuff. I am unaware of the sex of the baby, so I tried to keep everything gender neutral.

The lot of it 
This is the only picture I have of the teddy bear, but once I work out the kinks I will have a detailed pattern up
The blanket is just a giant granny square, with alternating rows of blue and variegated purple. The blue yarn is Loops and Threads Baby Yarn, and the purple is Red Heart Super Saver (I know I know, cheap yarn, I'm sorry)


My pride and joy. These are the first socks I have ever made, and I am so proud of how they came out. I think they will be perfect for the little baby's feet. The pattern is free and available on line, can be found here.
I know the pattern calls for cotton yarn, but I used the same baby yarn from the blanket and size 6 DPNS and I think they came out great!

The two hats I made were from the same pattern, but the yellow one is the smaller of the two available sizes. I used worsted weight Lion Brand baby yarn for this, and it is SO SOFT.


I had some leftover Sugar n Cream yarn from my Seature pattern, so I used it to make a bigger version of the hat above. However, in both patterns I only worked 4 and 3 inches of stockinette respectively, because I felt the hats were getting too long.

I hope my therapist loves all this, and puts it to some good use. I don't know about you, but the best part of crafting is giving it away and making someones day.

Stay crafty!

Lindsey

Sunday, February 23, 2014

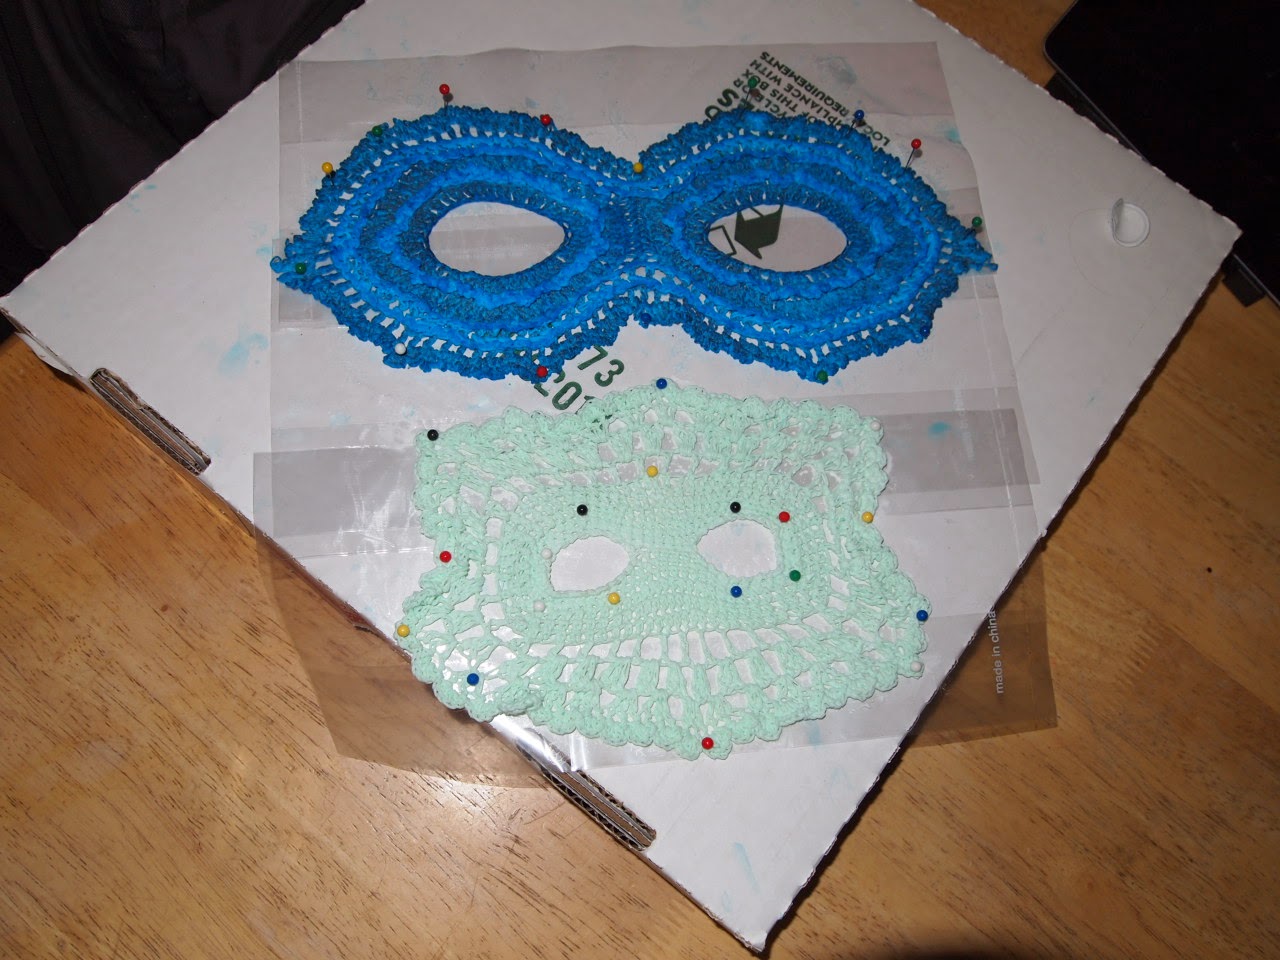
Masquerade Masks

Happy Sunday everyone!

This past week my arty teacher came to me and told me about a mask auction for a disabled school in my town. I was just going to do a generic plastic mask with some sequin and ribbon, but I realized I had seen some pictures of crocheted masks, and could probably do that instead! I looked on Ravelry for some patterns, but there were very few and none of them really stuck out to me. I decided to freehand them, thinking it'd be easy.

WRONG

This has been my most challenging project to date.. I had never done lace work before and trying to freehand lace is no easy task, let alone this being my first time working with crochet thread. 

Complaining aside, I'm very happy with how they came out. I ended up adding some embellishments per my art teacher's request, but the only pictures I have right now are them being blocked. To make them firm I used Mod Podge Fabric Hardener, which you can find at Michaels for around $6. 


I might try to write up a pattern for these soon, if I can figure out how to write it without being super confusing. Hope you have a great rest of your day!

Lindsey

Tuesday, February 18, 2014

KnitPicks Yarn Haul!

Hey everyone!

Life has been  a little crazy, so I'm sorry for not posting. I haven't been able to crochet or knit a lot lately, been bogged down by school work, but I have some patterns to put up soon! A few weeks ago, I did order from KnitPicks during their wool and book sale. I thought I would share the stuff I got; I'll try to post reviews once I work with it!

The whole shebang

Felici yarn in Jellybean, it's being discontinued!

Wool of the Andes!
Palette yarn in Aster and Lady Slipper

Books, size 3 circular needles, and a yarn stranding guide


Thanks for viewing! I'll be sure to post more stuff soon.
Love, Lindsey

Wednesday, February 5, 2014

Shamrock Shake Free Newborn Hat Pattern

Shamrock Shake Newborn Hat


Things You’ll Need
  • Size 8 Knitting Circular Needles or Double Pointed Needles
  • Size G Crochet hook
  • Worsted weight yarn in 2 shades of green (I used Loops and Threads Impeccable)
  • Yarn Needle


Techniques You Need to Know
  • Knitting in the round, either by Magic Loop (what I used) or using double pointed needles.
  • Crocheting in the round.

Lets get Started (Hat)
  1. (Using size 8 needles and dark green)Cast on 40 stitches
  2. Work in stockinette stitch for three inches (when working in the round, you just need to knit)
  3. *Knit three stitches, knit two together* repeat across the row
  4. Knit across the row
  5. *Knit two stitches, knit two together* repeat across the row
  6. Knit across the row
  7. *Knit first stitch, knit two together* repeat across the row
  8. *Knit two together* repeat across the row.
  9. Cut a long yarn tail (at least 6 inches) and draw through remaining loops on hook. Pull tight, and draw needle through back of hat, tie a knot, and cut remaining yarn.


Brim

  1. (Using size H crochet hook) Single crochet in each loop along the bottom of the hat for two rows.
  2. *Do 3 Half Double Crochet in first stitch, slip stitch in next stitch* Repeat across the row for a scalloped border.


Shamrock Decal
  1. *6 single crochet in magic ring, slip stitch to close, leaving a 6 inch yarn tail* Repeat three times.

  2. Surface crochet or embroider on a little stem for the shamrock, and stitch on the leaves with the yarn tail.


Rosie, my little model


Tada! Now your little leprechaun can look cute this Saint Patrick’s Day! Thank you so much for reading and trying my pattern. If you have any issues be sure to ask me any questions on here or email me at Streakshadow13@gmail.com. Please don’t resell or claim this pattern as your own. You may sell items made from it though :). Have a great day and enjoy your hats!


Love,


Lindsey


Saturday, January 25, 2014

Seature Pattern

Hey guys! Hope you are all having a fantastic evening. I had my birthday party today (my birthday is Monday) and it was super fun. Thought I would share a recent pattern of an amigurumi I made a while back. I made it to be a fish, but all of my friends thought it was a whale. Let's just call it "seature" (sea. creature. Get it?)


Seature Pattern


Things You’ll Need
  • Size H Hook
  • Worsted weight yarn, preferably cotton or acrylic. I used Sugar n Cream in Summer Prints
  • Stitch Marker
  • Keyring
  • Safety Eyes

Techniques You Need to Know
  • Magic Circle
  • Crocheting in the round
Lets get Started

Body
  1. Do six sc (single crochets) in Magic Ring or Chain 2 and do six sc in second chain from the hook. Put circle in keyring and crochet around ring.
  2. Do 2 sc in each sc around (12 sc)
  3. Do 2 sc in first stitch, and one sc in the next stitch. Repeat this across the round (18 sc)
  4. Do 2 sc in first stitch, and one sc in the next two stitches. Repeat this across the round (24 sc)
  5. Do 2 sc in first stitch, and one sc in the next three stitches. Repeat this across the round. (30 sc)
  6. Sc across the round, for 5 rounds (30 sc)
  7. Sc2tog (Single Crochet 2 together aka decrease) in first stitch, sc in next three sc. Repeat this across the round. (24 sc)
  8. Sc2tog in first stitch, sc in next 2 sc. Repeat this across the round. (18 sc)
  9. Apply safety eyes between 8th and 9th rows, and stuff
  10. Sc2tog in first stitch, sc in next sc. Repeat across the round. (12sc)
  11. Sc2tog each sc across the round. (6 sc)
  12. Make a slip stitch, cut leaving a long yarn tail. Using a yarn needle, weave the yarn tail through the remaining 6 stitches. Pull tight. Make a knot, and use a crochet hook to pull the knot through the softie.

Fins (make 2)
  1. 6 sc in magic circle. (6 sc)
  2. Sc in each sc for two rounds. (6sc)
  3. Sew on body.

Tail (make 2)
  1. 6 sc in magic circle. (6 sc)
  2. 2sc in each sc around. (12 sc)
  3. Do 2 sc in first stitch, and one sc in the next stitch. Repeat this across the round (18 sc)
  4. Fold 2 tail pieces in half, stitch together and then attach piece to body.


Thank you so much for reading and trying my pattern. If you have any issues be sure to ask me any questions on here or email me at Streakshadow13@gmail.com. Please don’t resell or claim this pattern as your own. You may sell items made from it though :). Have a great day and enjoy your hats!

Love,

Lindsey

Thursday, January 23, 2014

Insomnia Bunny

Morning!

I couldn't sleep last night and I'm not feeling too well today, but I could still crochet last night! Traversing through Reddit, Ravelry, and multiple Facebook groups, I had been seeing so many pictures of the Ugly Bunny Pincushion. Bunnies might as well be the cutest thing in the entire world, so of course I had to make one. Unfortunately, the pattern called for DK weight yarn, and I prefer/ only have cotton in the color bunny I wanted to make. So, my bunny is rather large (I used an H hook and worsted weight), but I love him as much as a tiny bunny. I also ran out of yarn towards the end, so the arms are short and I could only make one stubby ear. To cover the misfortune, I made him a tiny hat.

What should I name him? I'm thinking Cam.

Right after being finished

Pondering life

Bonding with the bae <3


If you would like to make your own bunny, you'll find the pattern here. I might be posting another pattern soon, so check back! Hope you're all having a great day.
Love,
Lindsey

Wednesday, January 22, 2014

Twisted Color Baby Hats


Hey everyone! It's a snow day here, and to keep myself busy I decided to make some baby hats. the only thing different is that I doubled up some medium weight yarn to make bulky yarn! When using bulky yarn, the hats work up much quicker, and also will be quite warmer for the babies. I have pretty much mastered the sizing of baby hats after making so many, but I had to adjust a bit for the bulkier yarn. Here is the pattern for the bulky yarn hats! Keep in mind, I make these to donate, so they are sized for newborns. 

Super Easy and Quick Baby Hat Pattern


Things You’ll Need
  • K or 6.50 mm hook
  • 2 Colors of an aran or worsted weight yarn. I used Caron Simply Soft
  • Stitch Markers or Safety Pins


Techniques You Need to Know
  • Magic Circle
  • Crocheting in the Round
Lets get Started
  1. Pick two colors of a worsted weight or aran weight yarn of your choice. You will be doubling up the yarn, or crocheting with two strands at a time.
  2. Either do 6 hdc (Half Double Crochet) in Magic Circle or chain 6 and do 6 hdc in the second chain from the hook.
  3. Do 2 hdc in each hdc around (12 hdc)
  4. Do 2 hdc in first stitch, and one hdc in the next stitch. Repeat this across the round (18 hdc)
  5. Do 2 hdc in first stitch, and one hdc in the next two stitches. Repeat this across the round (24 hdc)
  6. Do 2 hdc in first stitch, and one hdc in the next three stitches. Repeat this across the round. (30 hdc)
  7. Hdc across the round, for three rounds (30 hdc)
  8. Sc (single crochet) across the round (30 sc)
  9. This part may be a little complicated for new crocheters, but this isn’t necessary. Fpsc (Front post single crochet) in first stitch, and then sc in next stitch. Repeat across the round. this creates a ribbed effect. To put it simply, you are just crocheting a sc in the “body” of the stitch rather than the two loops above it. Here is a tutorial http://crochetparfait.blogspot.com/p/fpsc-front-post-single-crochet.html

I decided to test out the hats on Rosie, my model. 

Rosie approved.


Thank you so much for reading and trying my pattern. If you have any issues be sure to ask me any questions on here or email me at Streakshadow13@gmail.com. Please don’t resell or claim this pattern as your own. You may sell items made from it though :). Have a great day and enjoy your hats!


Love,


Lindsey